Saturday, December 4, 2010

Make Dreidel Earrings

Repurposed Dreidel Earrings by GeltDesigns
It is not secret that we love beads and beading. Webster defines a bead as "a small piece of material pierced for threading on a string or wire." So almost anything can made into a bead using a drill. Today, we are repurposing dreidels, making the dreidels into beads and then using the dreidels as the focal point for hoop earrings.


These earrings are so easy to make it is almost a crime, but our dreidel earrings were a definite hit last night at our neighborhood Chanukah party. Shhh. Don't tell they can be made in only a few moments.

Tools
Automatic center punch
Flex shaft and size 60 drill bit
Wire Wrapping Tools
Nylon jaw plier
Wire rounder
 Round nose pliers
Mandrel or three step pliers
Flush cutter or a side cutter
Rawhide or plastic mallet 

Step 1
Select two matching dreidels. We used two wooden dreidels that are very lightweight.

Step 2
Mark with Center Punch
Drill
Drill a hole in the stem of each dreidel. Select a drill bit that will drill a very small hole in the center of the stem of the dreidel. We used a size 60 drill bit. Mark the place where you want to make the hole with an automatic center punch so the drill bit does not slip when you drill the hole. Put the drill bit into your drill (we used our flex shaft, but you can use any drill, including a drill press or a Dremel) and drill a hole where you marked the dreidels.

Step 3
Make the ear wires. Straighten 20-gauge brass wire using nylon jaw pliers. Sand the end of the wire smooth using a wire rounder. Create a small loop in the end of the wire using round nose pliers. Wrap the wire around a mandrel (we used our favorite block) or three step pliers.

Cut the wire from the spool using a flush cutter or a side cutter.  Hit the formed loop with a rawhide or plastic mallet to harden the wire.

Slide onto the finding
Step 4
Slide the ear wire through the hole you drilled in the dreidel stem.

Step 5
Bend the wire
Bend the ear wire so that it will fit into the loop of the ear wire. Sand the end of the wire smooth using a wire rounder.


Related Tutorials
Make Your Own Dreidel
Chanukah Craft Projects for Kids 
GeltDesigns Tutorials by Topics  

Further Reading
500 Judaica: Innovative Contemporary Ritual Art (500 Series) 

Happy Chanukah!

Day 14. Week 2. Jewelry from Found Objects.  $ spent: 0
Found materials: Wooden Dreidels
New Jewelry a Day. 

Friday, December 3, 2010

Make a Bangle Bracelet from Steel Wire

Since we found this partially used spool of steel wire in our basement catchall tool drawer, we have had a lot of fun turning the wire into jewelry. To date, we made earrings  and a wire link bracelet.

Bracelet by GeltDesigns
Today, we share how we used the same wire, some leftover 6mm crystal quartz beads and 24-gauge brass wire to create an elegant bangle bracelet.

Tools
Round nose pliers  or 3-Step wire looping pliers
Chain nose
Wire rounder or needle file
Wire side cutters or flush cutters
Round or oval bracelet mandrel
Small ball pein hammer, plastic or rawhide mallet


Step 1
Measure your wrist or the wrist of the person for whom you are making the bracelet to determine the bracelet size needed.

Step 2
Make a simple bangle bracelet. Use round nose pliers  or 3-Step wire looping pliers to create a large loop at the end of the your round steel wire . Adjust the loop with your chain nose pliers so that the loop sits centered on top of the wire. Measure the length needed for your bracelet and cut the wire using wire side cutters or flush cutters.  File both ends of the formed wire  until they are smooth wire rounder or needle file.  Wrap the wire around a round or oval bracelet mandrel. Hit the formed bracelet with a small ball pein hammer, plastic or rawhide mallet while the bracelet is still on the mandrel to harden the wire.

Note: For this project, we are using the same technique we outlined in our tutorial
How to Make Your Own Silver Bangle Bracelet
except we embellished the bangle with beads and contrasting colored wire.


Step 3
Feed the beads onto the formed bracelet wire. Bend the other end of the wire to create a catch.

Step 4
Wrap the 24-gauge brass wire around the wire of the bangle five times beginning just above the clasp and before the first bead. Continue wrapping the 24-gauge brass wire over the first bead. Wrap the wire five times after the first bead. Repeat until you come to the end of the bracelet.


Step 5
Check your work. File any rough spots with a needle file, if needed.

Related Tutorials 
How to Determine Bracelet Sizes

How to Make Your Own Wire Wrapping Tool Kit
How to Care for Your Wire Wrapping Tools 
How to Straighten Wire 
How to Smooth Sharp Edges on Wire
How to Measure Wire
How to Use a Wire Gauge

How to Make Your Own Silver Bangle Bracelet
How to Store Beads 
GeltDesigns Tutorials by Topics  


Further Reading
Inspired Wire: Learn to Twist, Jig, Bend, Hammer, and Wrap for the Prettiest Jewelry Ever
Wire Style: 50 Unique Jewelry Designs
Bead on a Wire: Making Handcrafted Wire and Beaded Jewelry
Complete Guide To Making Wire Jewelry

Day 13. Week 2. Jewelry from Found Objects.  $ spent: 0
Found material: steel wire
New Jewelry a Day.

Thursday, December 2, 2010

Make a Bracelet from Steel Wire

Steel Bracelet by GeltDesigns
I love wire jewelry. Wire jewelry is easily made with inexpensive tools you likely already have around the house and, if not, you can purchase in your local hardware store. Wire jewelry requires no soldering or torch work. Many projects, including this one, can be made in under an hour.

Wire jewelry is one of the oldest forms of jewelry making. You can find examples of wire jewelry dating back to ancient Egypt. Almost every culture in almost every part of the world used wire to make jewelry and other adornments. Look in museums around the world and you will find inspiring wire bracelets and jewelry from long ago.

This bracelet is another wire project made from the same steel wire we used to make our earrings from steel wire. The bracelet consists of nine "S" links and four "coil" links plus an "S" clasp.

Tools
Round nose pliers  or 3-Step wire looping pliers
Wire rounder
Chain nose
Mandrel or  Wrap n' Tap  pliers
Wire side cutters or flush cutters

Step 1
Measure your wrist or the wrist of the person for whom you are making the bracelet to determine bracelet size.

Step 2
Make an "S" clasp from the round wire  using either  round nose pliers  or 3-Step wire looping pliers.  If you do not know how to make an "S" clasp or "S" link, see our tutorials Make Your Own "S" Clasp and Make Your Own "S" Chain. File the ends of the wire on the "S" clasp smooth using a wire rounder.

Step 3
Make the "S" links from the round steel wire.  File the ends of each "S" link using a wire rounder.

For our bracelet, we needed nine links but you may need more or less depending on the length bracelet you plan to create. 

Step 4
Make the coil links from the wire. Wrap the wire  around a mandrel about eight times. We used a pencil as a mandrel, but you can using anything including pens, markers or  specialty wire wrapping pliers called Wrap n' Tap  pliers. The size of the link will depend on how many times you wrap the wire. 

Remove the wire from the mandrel. Use your  chain nose pliers to open up the last wrap at the end of the coil. Bend the wire so it is perpendicular to the coil. Repeat on the other side of the coil. You will use the created rings on either side of the coil to attach the link to other links in your chain bracelet.  File both ends of each spiral link using a wire rounder.

For our bracelet, we used four spiral links. You can change the look of the bracelet by changing the number of each type of link or by changing the gauge wire you use. Smaller gauge wire is thicker and will produce a heavier looking chain. Conversely, larger gauge wire is thinner and will result in a more delicate looking chain.

Step 5
Assemble the links in the pattern you desire. Add the clasp at the end of the chain.

Related Tutorials 
How to Determine Bracelet Sizes
Make Your Own "S" Chain
How to Make a Simple "S" Clasp (with or without Beads)
Make Your Own "S" Clasp 
Make Your Own Beaded "S" Clasp
GeltDesigns Tutorials by Topics   

Further Reading
Classical Loop-in-loop Chains and Their Derivatives (Jewellery)
Making Wire Jewelry: 60 Easy Projects in Silver, Copper & Brass
Getting Started Making Wire Jewelry and More (Getting Started series)
Making Bead & Wire Jewelry: Simple Techniques, Stunning Designs
All Wired Up: Wire Techniques for the Beadworker and Jewelry Maker (Beadwork How-To)

Day 12. Week 2. Jewelry from Found Objects.  $ spent: 0
Found materials: steel wire

New Jewelry a Day.

Wednesday, December 1, 2010

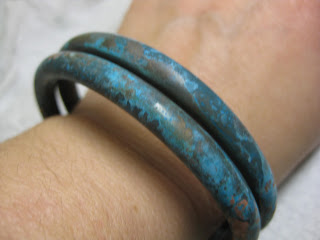
Make a Bangle Bracelet from a Copper Pipe

Copper Bracelet  by GeltDesigns
One of my early instructors had the class make tubing from sheet metal. Blech! The instructor wanted us to know how to fabricate everything from scratch. He was right, of course, the technique has proved very useful over the years. Metalsmiths use tubing to make hinges, bails, beads and hollow forms....but I still hate to make my own tubing. So I was thrilled when I realized that I had some scrap copper tubing in my junk drawer. Of course, the plumber who used it to install my refrigerator called my yummy copper tubing "piping" (LOL), but whatever. That fact is plain: copper piping is a great source for copper tubing.

The discovery of the pipe stash led to a number of jewelry ideas-- some simple, some less so. Today we present a very simple bangle bracelet made from copper pipes.

Tools
Jewelers saw and saw blades
Bench pin and anvil 
Half-round file
220-grit wet/dry sandpaper 
400-grit, 600-grit, 800-grit, 1000-grit, 1500-grit
Oval bracelet mandrel
Renaissance Micro-Crystalline Wax Polish 

Step 1
Measure your wrist or the wrist of the person for whom you are making the bracelet. Use your measurement to determine how much  copper pipe you will need to make your bracelet. See out tutorial How to Determine Bracelet Sizes  if you need help calculating  how much material you will need. For our bracelet, we used 18-inches of copper pipe.

Step 2
Cut the pipe. Steady the pipe on a bench pin and anvil and use your jewelers saw and saw blades to cut the pipe. You can use a tube cutting jig to hold the pipe steady while you saw, but a jig is not needed and some find tube cutting jigs more cumbersome when cutting long lengths of tube or  copper pipe.

Step 3
File the ends of the cut pipe with a half-round file to remove tool marks caused when sawing the pipe.

Step 4
Sand the ends using 220-grit wet/dry sandpaper to remove tool marks caused when filing the pipe ends. Switch to 400-grit, 600-grit, 800-grit, 1000-grit and then 1500-grit, if needed, until the ends are very, very smooth.

Step 5
Bend the copper tubing around the oval bracelet mandrel.

Note: If you are having trouble bending the copper tube, then it may be work hardened. If the copper pipe is difficult to bend, anneal the pipe with your torch to soften the metal and make it easier to form. Pickle the copper pipe to remove oxidation formed when annealing the copper pipe.
Step 6
Add color to the bracelet. Wet some paper towels with ammonia so the towels are damp but not soaking wet. Place the bracelet in the ammonia soaked paper towels and place into a sealed jar. Allow the ammonia to patina the copper overnight. There will likely be some blue on the paper towels.

Step 7
Coat the bracelet with Renaissance Wax to protect the patina.

Related Tutorials
How to Determine Bracelet Sizes 
How to Use a Jewelry Saw
How to Use a File for Jewelry Making
How to Use Sand Paper
How to Create a Blue Patina on Copper
All about Patina
How to Anneal Metal for Jewelry Making
How to Make Pickle
How Use Renaissance Wax
GeltDesigns Tutorials by Topics  

Further Reading
Contemporary Copper Jewelry: Step-by-Step Techniques and Projects
Mixed Metals: Creating Contemporary Jewelry with Silver, Gold, Copper, Brass, and More
Copper Art Jewelry: A Different Luster
Complete Metalsmith: Professional Edition

Day 11. Week 2. Jewelry from Found Objects.  $ spent: 0
Found materials: copper pipe (for ice maker and refrigerator)

New Jewelry a Day.