Showing posts with label Glass. Show all posts

Friday, February 11, 2011

Make a Beer Bottle into a Heart Pin

Before: Glass bottle
I miss the days when my three kids and I made Valentine's to hand out in school. Alas, they have outgrown the in-school, everybody-in-the-class Valentine exchange ... but nobody is ever to old for the annual V-day chocolate binge.  None of us can wait. Yum.

Today is Friday and project five of NJAD Valentine's Day week. We went back to our stash of bottles, broke a beer bottle into glass frit and fused it to create a nifty heart shaped pin. With so many, V-Day inspired jewelry, my daughter and I are going to have to negotiate who gets to wear what.

Have a great weekend.


After: Heart pin by GeltDesigns.com
Materials
Glass bottle
1-inch pin finding
Etching cream
Rubber gloves

Tools
Eye goggles Dust mask HammerKiln safe bisque mold
Kiln wash/ shelf primer
Glass fusing kiln
Welding goggles


Step 1
Clean the bottle.

Break bottle into frit
Step 2
Put on eye goggles and a dust mask to protect your eyes and lungs from glass dust and flying, broken shards of glass. Put the glass bottle into a plastic bag and wrap a towel around the bag to reduce the risk of flying shards of glass. Use a hammer to break the glass bottle into very small pieces. Warm glass artists call small pieces of broken glass frit.

We used a Carlsbad beer bottle. Carlsbad makes beer bottles in a really, really nice shade of green and the color withstands heat in the kiln.  


Put frit in heart mold
Step 3
Place the glass frit into a heart shaped mold prepared with kiln wash.


Step 4
Place the mold into the kiln. I based my firing schedule on experience from fusing the pendant from a beer bottle on January 4. I used a small top loading kiln, so I could watch the glass closely and see when the glass melted. For this project, I raised the kiln to 1500 degrees F and held it for about six minutes.

Note: Always put your kiln on a fire safe work surface and wear protective eye goggles (such as those used for welding or lampwork) when looking into a hot kiln.

Step 5
Anneal the glass. Lower the kiln to the annealing temperature(about 960 degrees F) and hold the kiln at that temperature for 10 minutes to anneal the glass.

Step 6
Allow the glass to cool to room temperature. Remove the glass from the kiln and wash off any kiln wash on the glass.

Step 7
Etch the glass. Put on rubber gloves and etch the glass with etching cream.

We etched the glass to give it a mat finish so that the findings were not visible through the pin.

Glue on pin back
Step 8
Glue the pin back finding to the back of the etched, heart shaped glass.

Related Tutorials
How to Make a Pin Back
Make Glass & Copper Earrings
Make a Pendant from a Bottle
Turn a Glass Jar into a Pendant
Make a Glass & Knotted Leather Necklace
Make a Glass & Brass Link Bracelet
Make Recycled Glass & Sterling Silver Earrings
Make a Kiln Formed Bracelet
Make a Glass Charm Necklace
NJAD Index (Days 1 to 60) by Type of Jewelry
NJAD Index (Days 1 to 60) by Type of Found Object 

Day 83.  Month 4. Jewelry from Found Objects.  $ spent to date: 0
Found materials: Carlsbad glass beer bottle
New Jewelry a Day.

Tuesday, January 11, 2011

Make a Pin from a Glass Pebble

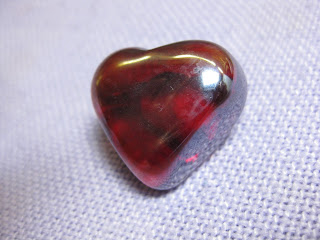
Before: Red Glass Heart
This pretty red heart was included in a flower arrangement sent to me. The flowers were a terrific surprise. They came in a really nice vase that we knew we would paint and reuse.... but in the bottom there were these glass pebbles that were designed to hold the arrangement in place. Some were clear glass. Some were red hearts!!! Yeah. The hearts were perfect for jewelry making.

We thought about waiting until Valentines Day but decided instead to make the pin now so one of us could wear it on Valentines Day.

Pin back and glass heart
Materials
Pin back finding
Heart shaped glass pebble
JB Weld or other glue

Step 1
Clean the glass heart with glass cleaner.

Add pin back
Step 2
Arrange the glass pin on the back of the heart to determine the best position.

Step 3
Glue on the pin back. Allow the glue to cure overnight or according to the glue manufacturer's instructions.

After: Glass Heart Pin by GeltDesigns.com
Related Tutorials
How to Paint Glass
How to Make a Pin Back

Further Reading
"Create Jewelry: Glass: Brilliant Designs to Make and Wear (Create Jewelry series)"; Marlene Blessing, Jamie Hogsett
"Designing Jewelry with Glass Beads"; Stephanie Sersich; 2008.

Day 52.  Month 3.  Jewelry from Found Objects.
Found materials: glass pebble

New Jewelry a Day.

Sunday, January 9, 2011

Make Glass & Copper Earrings

Broken Bowl
Today we took some more glass from a broken bowl and some pieces of scrap copper and turned them into earrings.

Materials
22-gauge copper sheet metal
20-gauge round copper wire
Glass

Tools
Diamond hole saw
Diamond drill bits
Acid etching cream
Disc cutter
Mandrel
Wire wrapping tools

Step 1
After: Earrings by GeltDesigns.com
Cut the glass into two disks using a hole saw. Drill a hole in each piece of glass with a diamond-coated drill bit to attach findings. File and sand the glass until the edges are smooth using a diamond file or glass grinder and then wet/dry sandpaper. Etch the glass with acid etch (or by sandblasting).

Step 2
Purchase or cut two copper disks. Cut a hole in each disk so it has a large off-center hole.

Step 3
Make or purchase copper ear wires.

Step 4
Assemble the pieces.


Related Tutorials
How to Drill Glass
How to Acid Etch Glass Beads
How to Use Sand Paper 
How to Use a File for Jewelry Making
How to Use a Disc Cutter
How to Make Your Own Hoop Ear Wires 

Further Reading
"Contemporary Warm Glass: A Guide to Fusing, Slumping & Kiln-Forming Techniques"; Brad Walker; 2000.
"Complete Metalsmith: Professional Edition"; Tim McCreight; 2004.
"Contemporary Copper Jewelry w/DVD: Step-by-Step Techniques and Projects"; Sharilyn Miller; 2010.


Day 50.  Month 3.  Jewelry from Found Objects.
Found materials: broken glass, scrap copper
New Jewelry a Day.

Tuesday, January 4, 2011

Make a Pendant from a Bottle

Before: Beer Bottle
Many folks look at the labels when selecting beer and wine. Not me. I confess I can not help but look at the glass of the bottle. I consider the shape of the glass and the color. Glass from bottles is a great raw material for making beads, platters and other art work. Reclaimed glass from bottles can be melted using a torch or a kiln.

For this project, I cut off the neck of a beer bottle one of my son's friends recommended after a semester in Europe. He wanted to try the beer. I was psyched by the rich green color of the bottle.

Melting reclaimed glass is always unpredictable. The color often changes when heated and formed and the temperature needed to form the glass is always uncertain. This glass proved a success. The pendant took exactly the form I hoped and the color stayed as rich and pretty as it was in the store.

After: Pendant by GeltDesigns.com
Materials
Glass bottle
Stringing material
Sterling silver end caps
G-S Hypo Cement.
18-gauge sterling silver half hard round wire.

Tools
Glass fusing kiln
Ring saw
Kiln safe bisque mold
Kiln wash/ shelf primer

Step 1
Drink the beer and wash out the bottle. Set aside. It is not a good idea to operate saws or kilns after drinking alcohol.

Cut top off bottle with saw.
Step 2
Cut off the top of the bottle using a ring saw or glass cutter.

Step 3
Clean the cut glass.
Clean the glass with glass cleaner to remove residue from sawing and prevent devitrification when kiln forming the reclaimed glass.

Step 4
Put the glass in a mold.
Place the clean glass in a mold prepared with kiln wash. Use of a mold is optional. You can melt the glass on a kiln shelf prepared with kiln wash, but use of a mold will ensure that the pendant has a nice shape. We used a round mold and we cut the bottle slightly off center so the pendant would melt a round, thick piece with a hole that is off center.

Step 5
Place the glass in the kiln
Place the mold in the glass fusing kiln. Since I did not know the COE of the glass, I could not predict the fusing cycle. As such, I decided to use a small top loading kiln, so I could watch the glass closely and see when the glass had melt to the point I liked. For this project, I raised the kiln to 1500 degrees F and held it for eight minutes. When I opened the kiln to check the glass, I found that the glass was not melted enough, so I repeated three times until the glass melted into the shape I liked. The process was prolonged because the temperature of the kiln dropped each time I opened it to check the glass.

Note: Always put your kiln on a fire safe work surface and wear protective eye goggles when looking into a hot kiln.

Step 6
Anneal the glass. Lower the kiln to the annealing temperature(about 960 degrees F) and hold the kiln at that temperature for 10 minutes to anneal the glass.

Step 7
Allow the glass to cool to room temperature. Remove the glass from the kiln and wash off any kiln wash on the glass.

Add stringing material
Step 8
Cut a piece of stringing material to the length needed. Pull the stringing material through the hole in the glass and tighten.

Step 9
Add findings. We used some sterling silver end caps that we added to the end of the imitation leather stringing material using pliers. We secured the end caps with a drop of G-S Hypo Cement.
We added a hook style clasp made from 18-gauge sterling silver half hard round wire.

Related Tutorials
How to Melt Wine Bottles into a Bead
How to Melt Wine Bottles into a Cheese Tray
How to Melt Wine Bottles into Jewelry
How to Melt Wine Bottles for Lampwork
Make Your Own Hook & Eye Clasp
Make Your Own "S" Clasp
How to Make a Simple "S" Clasp (with or without Beads)  

Further Reading
"Glass Kiln Casting with Colour de Verre - 10 Projects for Frit Cast Jewelry, Plates & Bowls"; Jayne Persico; 2007.

Sunday, January 2, 2011

Turn a Glass Jar into a Pendant

Before: Blue Jar
When I first saw this jar, I loved the color. The weight of the jar convinced me it would be great for jewelry making.

Mark the jar
At first, I thought I would use my ring saw to cut the bottom of the jar into the shape of a heart. That plan proved problematic when I tried to cut the jar. The ring saw did not have enough space to cut the jar... and the jar was a tad thick and acting quite uncooperative to cut the top off using only a glass cutter. I was frustrated, so I did what I sometimes do when I am frustrated with a glass project: I made the glass jar into frit.

After: Necklace by GeltDesigns
After making the jar into frit, I fused the glass into three glass beads and strung the beads on a leather-like stringing material.

Materials
Glass
Leather, imitation leather or other stringing material
Seed beads

Tools
Glass fusing kiln
Fiber paper
Fiber rope


Step 1
Make the jar into frit. Turing a jar into frit is a fancy way of saying I broke the jar into tiny pieces that I could use to fuse into another shape. The technique requires a hammer and something to catch the small pieces. I use a box  constructed of wood. After cleaning the glass, I put the glass into a plastic bag to keep the glass clean. I place the glass into the wood box and then hit the glass with an old, heavy sledge hammer until the glass is the size I want.

Great therapy... in addition to being a great way to recover glass for use in kiln forming. :)

Step 2
Fuse the frit into a flat piece of glass. I placed the glass frit into the kiln in a pot and then let the glass melt down through the pot onto the bottom of the kiln (prepared with kiln wash, of course) until the glass was flat.

Step 3
Make the beads. Cut the glass into six strips the size you want for your beads. Place three of the strips on a piece of fiber paper on the shelf of your glass fusing kiln. 

Put two strands removed from fiberfrax rope on each piece of glass to create channels for the bead holes. Note that the fiberfrax rope will be thicker than you want to create channels to serve as a bead hole. You will need to unravel the rope and take a strand or two to use to create the holes for the beads. You can purchase fiberfrax or ceramic fiber rope at most stained and fused glass suppliers or online from companies like Slumpy's or Delphi Glass. Wear a dust mask when working with fiber rope to protect your lungs.

Place another piece of glass on top of each glass strip. You can use a drop of glass fusing glue to hold the beads in place while you place the glass into the kiln (and while firing), but be sure to allow the glue to dry before firing. Fire the beads in your glass fusing kiln until fully fused.

Step 4
Stringing material
Remove the beads from you glass fusing kiln once the kiln reaches room temperature. Clean the beads and remove the fiber rope from the holes in the beads.

String the Beads
Step 5
String the beads on your stringing material. My daughter and I used imitation leather from a large spool, but almost any stringing material can be used. Cut a long piece of stringing material. Feed on one fused glass bead to join both ends of the string. Feed on a seed bead on each string. Feed on the next fused glass bead. Repeat until all three beads are strung and separated by seed beads.

Step 6
Tie the ends
Test the necklace to be sure the length works.

Step 7
Tie a square knot below the fused glass bead on both sides of the string. Allow about a 1-inch tail for each end of the string.

Step 8
Measure about 1-1/2 inches above the fused glass bead and make a square knot. Measure another 1-1/2 inches above the first knot and create a second square knot.

Related Tutorials
Make Your Own Fused Glass Bead
How to Make a Fused Glass Bead
How to Acid Etch Glass Beads  

Further Reading
"Warm Glass: A Complete Guide to Kiln-Forming Techniques: Fusing, Slumping, Casting";  Philippa Beveridge, Ignasi Domenech, Eva Pacual; 2005.
"Contemporary Warm Glass: A Guide to Fusing, Slumping & Kiln-Forming Techniques": Brad Walker; 2000.
"Fused Glass Handbook"; Gil Reynolds; 1987.
"Fuse It - 18 Fused Glass Projects": Petra Kaiser; 2007.
"Innovative Adornments - Introduction to Fused Glass & Wire Jewelry";  Jayne Persico; 2002.
"Richard La Londe: Fused Glass Art and Technique"; 2006.

New & Noteworthy
"Contemporary Fused Glass";  Brad Walker; 2010.
"Microwave Kiln Techniques: For Fused Glass Jewelry, Stained Glass Projects and Silver Clay"; Geneva Perkins.

Day 43.  Month 3.  Jewelry from Found Objects.  

Found materials: Glass jar
New Jewelry a Day.