Tuesday, January 11, 2011

Make a Pin from a Glass Pebble

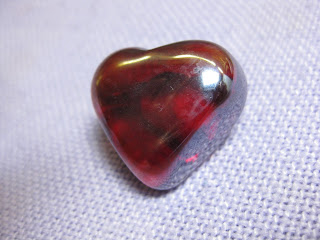
Before: Red Glass Heart
This pretty red heart was included in a flower arrangement sent to me. The flowers were a terrific surprise. They came in a really nice vase that we knew we would paint and reuse.... but in the bottom there were these glass pebbles that were designed to hold the arrangement in place. Some were clear glass. Some were red hearts!!! Yeah. The hearts were perfect for jewelry making.

We thought about waiting until Valentines Day but decided instead to make the pin now so one of us could wear it on Valentines Day.

Pin back and glass heart
Materials
Pin back finding
Heart shaped glass pebble
JB Weld or other glue

Step 1
Clean the glass heart with glass cleaner.

Add pin back
Step 2
Arrange the glass pin on the back of the heart to determine the best position.

Step 3
Glue on the pin back. Allow the glue to cure overnight or according to the glue manufacturer's instructions.

After: Glass Heart Pin by GeltDesigns.com
Related Tutorials
How to Paint Glass
How to Make a Pin Back

Further Reading
"Create Jewelry: Glass: Brilliant Designs to Make and Wear (Create Jewelry series)"; Marlene Blessing, Jamie Hogsett
"Designing Jewelry with Glass Beads"; Stephanie Sersich; 2008.

Day 52.  Month 3.  Jewelry from Found Objects.
Found materials: glass pebble

New Jewelry a Day.

Monday, January 10, 2011

Make a Leather & Brass Link Bracelet

After: Bracelet by GeltDesigns
Before: Wire on spool

Materials
Stringing material
16-gauge brass wire

Tools
Wire wrapping tools

Make the links
Step 1
Make the brass links. Attach the links to create a chain.

Make the clasp
Step 2
Make the clasp.

Step 3
Weave through the links
Weave the suede, leather, imitation leather or other stringing material through the links and around the clasp. Secure the material by knotting. Use a drop of Barges glue, if needed, to hold the knot.

Day 51.  Month 3.  Jewelry from Found Objects.
New Jewelry a Day.

Sunday, January 9, 2011

Make Glass & Copper Earrings

Broken Bowl
Today we took some more glass from a broken bowl and some pieces of scrap copper and turned them into earrings.

Materials
22-gauge copper sheet metal
20-gauge round copper wire
Glass

Tools
Diamond hole saw
Diamond drill bits
Acid etching cream
Disc cutter
Mandrel
Wire wrapping tools

Step 1
After: Earrings by GeltDesigns.com
Cut the glass into two disks using a hole saw. Drill a hole in each piece of glass with a diamond-coated drill bit to attach findings. File and sand the glass until the edges are smooth using a diamond file or glass grinder and then wet/dry sandpaper. Etch the glass with acid etch (or by sandblasting).

Step 2
Purchase or cut two copper disks. Cut a hole in each disk so it has a large off-center hole.

Step 3
Make or purchase copper ear wires.

Step 4
Assemble the pieces.


Related Tutorials
How to Drill Glass
How to Acid Etch Glass Beads
How to Use Sand Paper 
How to Use a File for Jewelry Making
How to Use a Disc Cutter
How to Make Your Own Hoop Ear Wires 

Further Reading
"Contemporary Warm Glass: A Guide to Fusing, Slumping & Kiln-Forming Techniques"; Brad Walker; 2000.
"Complete Metalsmith: Professional Edition"; Tim McCreight; 2004.
"Contemporary Copper Jewelry w/DVD: Step-by-Step Techniques and Projects"; Sharilyn Miller; 2010.


Day 50.  Month 3.  Jewelry from Found Objects.
Found materials: broken glass, scrap copper
New Jewelry a Day.

Saturday, January 8, 2011

Make an Enamel Necklace from a Copper Pipe

Before: Copper Refrigerator Tubing
We demonstrated how to make copper pipe into a neck-ring. In this project, we enameled the copper neck-ring to add color.

Materials
Copper pipeEnamel


Tools
Jewelry kiln or torch
After: Copper Enameled Neck-Ring by GeltDesigns.com
Tripod or other kiln furniture (to hold enamel when firing)
Fork or spatula (to move enamel)

Step 1
Make a neck-ring. Follow the instructions in our tutorial "How to Make a Neck-Ring from Copper Pipe."

Step 2
Paint white liquid enamel on the copper pipe using a paint brush dedicated to enamel.

Step 3
Sift powder enamel over the liquid enamel. We used a pale blue. The powder will stick to the liquid enamel an add color.

Step 4
Fire the enamel using a kiln or a torch. We fired this neck-ring with a torch to get a rough, earthy look.

Step 5
Remove the fired enamel from the kiln or the flame of the torch. Allow the enamel to cool to room temperature.

Step 6
File the edges of the copper enamel neck-ring to remove oxidation or fire-scale, if any.

Related Tutorials
Make a Neck-Ring from Copper Pipe
Make a Bangle Bracelet from a Copper Pipe
Make a Beaded Bracelet with Copper Pipe & Wire
How to Make a Copper Bead
How to Make a Copper Necklace

How to Torch Fire Enamel 

Further Reading 
"Enamels, Enameling, Enamelists (Jewelry Crafts)"; Glenice L. Matthews; 1984.
"The Art of Enameling: Techniques, Projects, Inspiration";  Linda Darty; 2006.
"First Steps in Enameling";  Jinks McGrath; 2003.
"Enamelling (The Art of Crafts)";  Joan Bolton King; 2001.
"The Art of Fine Enameling";  Karen L Cohen; 2004.
"Color on Metal: 50 Artists Share Insights and Techniques": Tim McCreight, Nicole Bsullak; 2001.


Day 49.  Month 3.  Jewelry from Found Objects.
Found materials: copper pipe
New Jewelry a Day.

Friday, January 7, 2011

Make Post Earrings from a Gift Card

Before: History Channel Gift Card
Like Tony Soprano, my entire family loves the History Channel....so when we saw the History Channel Pop Shop in Times Square we had to check it out. The store gave each of my kids a gift card inviting them to download a free episode from iTunes. My kids were all psyched. Even the adults. My daughter and I were double psyched. Free downloads and a card that could make interesting jewelry! Excellent!

We decided to use one gift card to make post earrings. We used clip-on posts rather than pierced posts for this project (because that is what we had on hand and our pledge is to make stuff for a year for NJAD with things we have or we reclaim), but the process is the same with clip-on or post earrings.


After:Clip-on Earrings by GeltDesigns.com
Materials
Credit card, gift card or other plastic card
Clip-on earring findings
JB Weld  or other glue


Tools
Disc cutter
Wet/dry sandpaper, assorted grits


Step 1
Cut the gift card
Use a disc cutter, craft knife or scissors to cut the gift card into two 3/4-inch disks.

Step 2
Sand edges of plastic
Sand the edges of the plastic disks with wet/dry sandpaper to remove frayed edges and make the disks jewelry smooth.

Tip: place the wet/dry sandpaper on your work surface and move the disk for an easier time sanding.

Step 3
Glue the finding to the disk
Arrange the findings on the top third of the prepared disk. Placing the findings on the top third of the earring will allow the earring to hang best and make the earring more comfortable-- especially important for clip-on earring findings.

Mark the disk where you plan to glue with a marker, if needed.

Step 4
Glue the clip-on or other post finding to the disk. Allow the JB Weld or the glue of your choice to cure overnight or according to the glue manufacturer's instructions.

Related Tutorials
How to Use a Disc Cutter 
Make a Necklace from a Credit Card
Make a Bracelet from a Gift Card
Make Earrings from an iTunes Gift Card
How to Make Earrings from a Credit Card  
How to Make a Bracelet from a Credit Card 
Make Post Earrings from Vintage Game Pieces
Make Post Earrings from Buttons


Further Reading
"Fabulous Jewelry from Found Objects: Creative Projects, Simple Techniques"; Marthe Le Van; 2007.
"Beaded Jewelry with Found Objects: Incorporate Anything from Buttons to Shells";  Carole Rodgers; 2004.
"Junk to Jewelry: A Step-by-Step Guide to Using Found Objects in Jewelry You Can Actually Wear"; Brenda Schweder; 2007.


New & Noteworthy

"Jewelry from Found Objects";  Heather Skowood; 2011.

Day 48.  Month 3.  Jewelry from Found Objects.
Found materials: gift card
New Jewelry a Day.


TGIF!!