 |
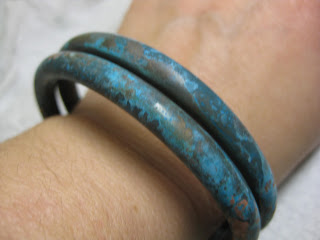
| Copper Bracelet by GeltDesigns |
The discovery of the pipe stash led to a number of jewelry ideas-- some simple, some less so. Today we present a very simple bangle bracelet made from copper pipes.
Tools
Jewelers saw and saw blades
Bench pin and anvil
Half-round file
220-grit wet/dry sandpaper
400-grit
Oval bracelet mandrel
Renaissance Micro-Crystalline Wax Polish
Step 1
Measure your wrist or the wrist of the person for whom you are making the bracelet. Use your measurement to determine how much copper pipe you will need to make your bracelet. See out tutorial How to Determine Bracelet Sizes if you need help calculating how much material you will need. For our bracelet, we used 18-inches of copper pipe.
Step 2
Cut the pipe. Steady the pipe on a bench pin and anvil and use your jewelers saw and saw blades
Step 3
File the ends of the cut pipe with a half-round file to remove tool marks caused when sawing the pipe.
Step 4
Sand the ends using 220-grit wet/dry sandpaper to remove tool marks caused when filing the pipe ends. Switch to 400-grit
Step 5
Bend the copper tubing around the oval bracelet mandrel.
Note: If you are having trouble bending the copper tube, then it may be work hardened. If the copper pipe is difficult to bend, anneal the pipe with your torch to soften the metal and make it easier to form. Pickle the copper pipe to remove oxidation formed when annealing the copper pipe.
Step 6
Add color to the bracelet. Wet some paper towels with ammonia so the towels are damp but not soaking wet. Place the bracelet in the ammonia soaked paper towels and place into a sealed jar. Allow the ammonia to patina the copper overnight. There will likely be some blue on the paper towels.
Step 7
Coat the bracelet with Renaissance Wax
Related Tutorials
How to Determine Bracelet Sizes
How to Use a Jewelry Saw
How to Use a File for Jewelry Making
How to Use Sand Paper
How to Create a Blue Patina on Copper
All about Patina
How to Anneal Metal for Jewelry Making
How to Make Pickle
How Use Renaissance Wax
GeltDesigns Tutorials by Topics
Further Reading
Contemporary Copper Jewelry: Step-by-Step Techniques and Projects
Mixed Metals: Creating Contemporary Jewelry with Silver, Gold, Copper, Brass, and More
Copper Art Jewelry: A Different Luster
Complete Metalsmith: Professional Edition
Day 11. Week 2. Jewelry from Found Objects. $ spent: 0
Found materials: copper pipe (for ice maker and refrigerator)
New Jewelry a Day.


This is great! Thanks for sharing.
ReplyDeleteThe blue patina is fantastic. I will be featuring/linking this and the other copper pipe jewelry tutorials in a future post so others can come visit.
ReplyDeletePearl
http://www.beadinggem.com
Nice blog dear I like the way as you present your view among the all visitors. I would like to join you again on this blog it’s a very nice visit on this blog. It’s very attractive and effective for visitors. Copper Wire Manufacturers, Copper Wire Manufacturers in India
ReplyDeleteHi!
ReplyDeleteI am your new follower!
Loved the bracelet! Very creative!
Do visit my blog too and follow it if you like!
Alia
http://aliascreativelife.blogspot.com/
I found your post really helpful. Thanks for posting such informative content. Keep posting. Copper Wire Manufacturers in India, Copper Wire Suppliers
ReplyDeleteHello, I love reading through your blog, I wanted to leave a little comment to support you and wish you a good continuation. Wish you best of luck for all your best efforts. Switchgears, copper wire.
ReplyDeleteDid you leave the ends of the copper tubing open?
ReplyDeleteI'd like to see what the sawed off, filed down ends look like?
Love the patina finish.
Nice tutorial and great final result. It would have been helpful if you had addressed how you finished the ends.
ReplyDeleteCopper tubing are the most versatile plumbing material that can be concealed for both hot and cold water applications. These tubings are available in different forms including coiled rolls and straight pipes in varying diameters. When I see this creative Bangle Bracelet from a Copper Pipe, I was amazed. Great idea and thanks for sharing. I appreciate it!
ReplyDeleteHello, can you please show how you finished the ends. Thanks.
ReplyDelete