Friday, January 28, 2011

Make a Charm Bracelet from Toy Figurines

Snow again. Yesterday the kids had no school and we had intermittent electricity. Today school started two hours late.  Our power was restored but folks all of over town still have no power --
Before: Toys in the toy box
and that includes many traffic lights. DC is a mess.

For the past three days, I had to begin my day by shoveling snow and I have body parts that hurt that I did not even remember I had. Why should my side be sore from shoveling snow? (We all know my sore parts could not be due to sledding or otherwise playing in the snow! It has to be the shoveling!)

After: Charm Bracelet by GeltDesigns.com
The good news for the GeltDesigns girls is that the snow gave us extra time to play in our studio -- after we finished playing in the snow. Today, we used more toy figurines to make a charm bracelet.


Materials
Silver chain with clasp
Seven jump rings
Seven small screw eyes
Seven figurines

Tools
Parallel flat nose pliers or
Parallel chain nose pliers


Step 1
Select the toys. Arrange the toys in the order you want to use them as charms for your bracelet. Gather your other tools and materials.  

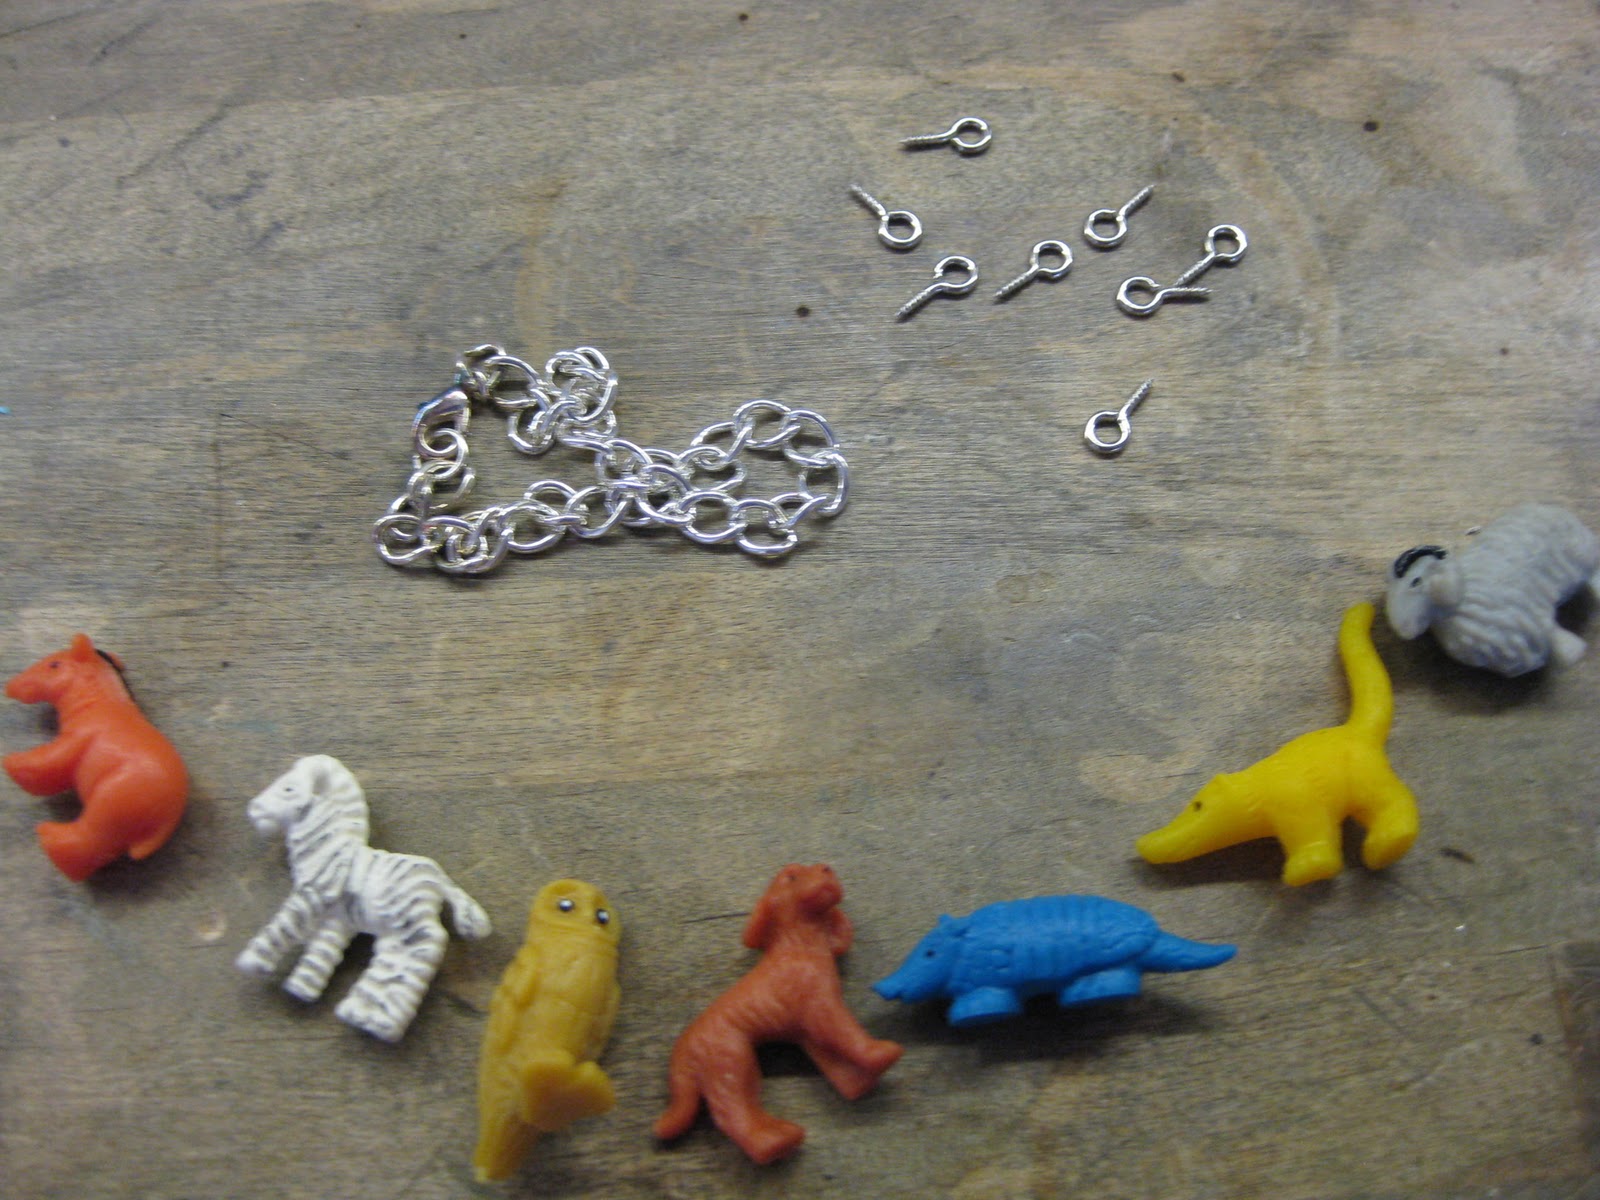
We picked seven figurines of about the same size in different shapes and colors, but you can use more or less depending on the toys you pick. Picking the items and arranging the order is half the fun.


Step 2
Take a toy and make a divot in the toy where you want to attach the screw eye.  Begin screwing the screw eye into the back where you made the divot. For most soft plastic toys, you do not need to drill first; unless the plastic is quite hard, just mark the toy and begin screwing the part into the toy.

Use pliers for added leverage when screwing in the eye. It may be easier to hold the screw eye with your pliers and turn the toy figurine to secure the finding rather than trying to screw the eye into the toy.

Use jump ring to attach toy charm
Step 3
Attach a jump ring to the screw eye and to the chain.

Step 4
Repeat with each remaining figurine until the bracelet is complete.

Related Tutorials
How to Make Jump Rings
Make Game Piece Earrings
Make a Spider Pin from a Toy
Make a Necklace from Figurines
Make a Lizard Pin from a Toy
Make Dog Earrings from Toys
Make Post Earrings from Vintage Game Pieces

Further Reading
"500 Bracelets: An Inspiring Collection of Extraordinary Designs (500 Series)"; Lark; 2005.
 "1000 Ideas for Creative Reuse: Remake, Restyle, Recycle, Renew (1000 Series)"; Garth Johnson; 2009.

New & Noteworthy
"1,000 Steampunk Creations: Neo-Victorian Fashion, Gear, and Art (1000 Series)"; Grymm; 2011.

Day 69.  Month 3. Jewelry from Found Objects.  $ spent to date: 0
Found materials: toys
New Jewelry a Day.

TGIF! Enjoy your weekend. :) 


Thursday, January 27, 2011

Make a Bracelet from a Plastic Bottle

Before: Plastic bottle
Yesterday we made a cuff bracelet from a used shampoo bottle taken from our recycling can. The bottle was one of those tank sized bottles purchased at Costco so it was easy to make a cuff bracelet.

After: Boxed bracelet by GeltDesigns.com
Today we are used another plastic bottle taken from the recycling can and used the plastic to make diamond shaped charms for a bracelet. Same technique. Different look.

Materials
Plastic bottle
Jump rings
Clasp

Tools
Scissors
Xacto knife
Center punch or automatic center punch
Flex shaft, Dremel or drill press
Micro-drill bit set (#61-80)
Pyrex measuring cup
Mandrel (optional)

Step 1
Select the bottle. We used a bright green bottle. Remove all stickers and clean the bottle.

Step 2
Cut the plastic using a craft knife or scissors. We cut our diamonds about 1-1/4 inch square, but you can make the plastic charms any size you want.

Step 3
Mark the plastic where you want holes with a center punch or automatic center punch. Drill holes in the marked spots.

Step 4
Flatten and form the plastic. Dip the plastic in hot (but not boiling) water to shape the plastic charms and soften the edges of the plastic. We used a mandrel to get a slight bend in the plastic charms so the bracelet would fit better when worn but many household items (including a stainless steel coffee cup) can be used to form the plastic charms.

Add jump rings to create chain
Step 5
Feed a jump ring through each drilled hole. Connect the charms with additional jump rings to make a chain. We used gold filled jump rings and findings (because we liked the color contrast and that is what we had) but you can use any size or metal findings you like for your design.

After: Upcycled Bracelet by GeltDesigns.com
Step 6
Add the clasp. We used a spring clasp, but you can use any clasp you like.


Related Tutorials
How to Determine Bracelet Sizes
Make a Cuff Bracelet from a Plastic Bottle
How to Make a Soda Bottle  Bracelet
How to Make a Knitting Needle Bracelet
How to Make a Record Cuff Bracelet
How to Make a Pop Top Bracelet

Further Reading
"500 Bracelets: An Inspiring Collection of Extraordinary Designs (500 Series)"; Lark; 2005.
"500 Plastic Jewelry Designs: A Groundbreaking Survey of A Modern Material (500 Series)"; Lark; 2009.
"The Art of Jewelry: Plastic & Resin: Techniques, Projects, Inspiration"; Debra Adelson; 2008.

Day 68.  Month 3. Jewelry from Found Objects.  $ spent to date: 0
Found materials: plastic bottle
New Jewelry a Day.

Wednesday, January 26, 2011

Make a Cuff Bracelet from a Plastic Bottle

Before: Plastic Bottle
Plastic bottles from your recycling bin are great sources of raw materials for jewelry making. Plastic bottles can be cut up into beads for stringing into pendant, bracelets, necklaces and earrings. Plastic can also be easily shaped and molded with heat. In this project we turned an old, empty, rather large shampoo bottle purchased at Costco into a cuff bracelet.

After: Cuff Bracelet by GeltDesigns.com
Materials
Plastic bottle

Tools
Scissors
Xacto knife
Pyrex measuring cup
Mandrel

Step 1
Wash out the bottle. Remove all labels. Rinse away residue from glue.

Step 2
Cut the plastic using a craft knife or scissors. The side of our bottle had an interesting texture designed to give the bottle a better grip. We centered the textures grip when cutting so it would be prominent when we formed the bracelet.

Put plastic in hot water
Step 3
Heat water in a Pyrex dish to just below boiling. Place the plastic into the hot water so it becomes soft and pliable. Do not overheat the plastic to the point of melting.

Step 4
Form the plastic into a cuff bracelet
Remove the plastic from the hot water and form the plastic around a mandrel. You can use a bracelet mandrel or another household item. In this photo, we used the base of a stainless steel coffee cup as a mandrel.

Related Tutorials
How to Make a Soda Bottle  Bracelet
How to Make a Knitting Needle Bracelet
How to Make a Record Cuff Bracelet
How to Make a Pop Top Bracelet

Further Reading
"500 Plastic Jewelry Designs: A Groundbreaking Survey of A Modern Material (500 Series)"; Lark; 2009.
"The Art of Jewelry: Plastic & Resin: Techniques, Projects, Inspiration"; Debra Adelson; 2008.
"Shrink Art Jewelry (Klutz)"; Karen Phillips; 2007.

Day 67.  Month 3. Jewelry from Found Objects.  $ spent to date: 0
Found materials: plastic bottle
New Jewelry a Day.

Tuesday, January 25, 2011

Make a Cartoon Pendant

I have a dirty secret. I let my kids watch ridiculous amounts of cartoons when we are on the road. In the early years of motherhood, I tried to insist my kids would look out the window when we drove. I was young and idealistic. I had my kids best interests at heart.

The "look out the window and learn" ideal quickly melted away around the forty-eighth time one of my kids started yelling, "He's looking at me! Make him stop looking at me!" Oy. "Lookits" and "touchers." I remember the same style of teasing when I was a kid and now my kids were doing it as well. I challenge you to make one of your kids stop looking at the other. In the car. While driving. Talk about distracted. Out came the VCR. Then the DVD. Now the kids use computers and are wishing for an iPad. Same car. Different technology. Clearly, I failed the battle hymn of the tiger mother.

Bottom-line: although they started off with Sesame Street, now my kids love to watch the Simpsons and other cartoons when we are on the road. Yes, even my Dean's list, distinguished AP scholars. Simpsons. Over and over again. Thank goodness for headphones, so I do not need to listen for what seems like the millionth time. (The only thing worse than "are we there yet?" is hearing the Simpsons on TV saying "are we there yet?")

Before: Broken Toy
I do not know where this Krusty the Clown toy came from. One of the kids may have wanted the toy for a birthday present long ago. The toy may have been a giveaway from some junk food meal. Or the toy may have been a party favor from a long ago party. We found the broken toy in the toy box. Krusty lost his body; all we had left was the head...but we all agreed the broken toy would make a funky looking pendant.

After: Pendant by GeltDesigns.com
Materials
Toy
2 small screw eyes
1mm black satin cord

Tools
Flex shaft, Dremel or drill press
Size 58 drill bit 
Center punch
Parallel pliers or chain nose pliers 

Step 1
Clean the toy.

Step 2
Mark the top of the toy with the center punch and then drill a hole in the top of the toy. Marking the toy will prevent the drill bit from slipping when you drill the plastic toy.

Step 3
Screw the screw eye into the drilled hole. Use the pliers for leverage when you screw to help screw the screw eye into the toy.

Step 4
Feed the 1mm black satin cord (or chain of your choice) through the hole of the screw eye.

Related Tutorials
Make Dog Earrings from Toys  
Make a Spider Pin from a Toy
Make a Lizard Pin from a Toy
Make a Necklace from Figurines

Further Reading
"500 Pendants & Lockets: Contemporary Interpretations of Classic Adornments (500 Series)"; Lark; 2008.
"Simpsons World The Ultimate Episode Guide: Seasons 1-20";  Matt Groening; 2010.
"The Krusty Book (The Simpsons Library of Wisdom)"; Matt Groening; 2006. 

Day 66.  Month 3. Jewelry from Found Objects.  $ spent to date: 0
Found materials: screw eye, toy
New Jewelry a Day.