Thursday, January 2, 2014

Make a Ring from Scrap Wire & a Bead


wire wrapped ringsRings are a great fashion accessory. Rings require little metal and are a great project to make with limited resources. You can make a wire wrapped ring using scrap wire leftover from other projects and a bead or two.  

Materials
16-gauge copper wire
Lampwork glass bead(s),


Tools
Ring mandrel
Raw hide hammer or plastic mallet,
Cup burr or needle file
Tumblerstainless steel shot (optional)

Step 1
Assemble your tools and materials. In our example, we used 16-guage copper wire, but scrap wire in gold, silver, brass or any other nonferrous metal can be used to make a ring. Similarly, different gauge wires can be substituted if you want a ring with a finer or heavier look. Select the lampwork bead, checking to be sure the wire will fit through the bead.

Step 2
Check ring size
Measure your finger or the finger of the person for whom you would like to make the ring.  Use a ring that fits well and slide the ring onto the ring mandrel to measure ring size if you do not have a ring sizer.

Step 3
Slide the focal bead onto the wire.

Step 4
Wrap the wire around the ring mandrel the number of times needed for your wire wrapped ring. Fit the wire through the bead each time you wrap. In our example, we show rings with one, two and three wraps.

sizing a wire ringStep 5
Check the ring as you work to be sure the ring is sized  correctly.

Step 6
Stop wrapping with the ends of the wire close to the bead. Tuck the wire ends under the bead and trim any excess.

You can also bend the ends of the wire up to hold the bead so that they look like prongs. If you chose to use the prong method for your wire wrapped ring, then be sure to file the prong tips with a cup burr or needle file so that the prongs are not sharp.

Step 7
Harden the wire of your wire wrapped ring so the ring will maintain its shape. Harden the wire by hitting the wire with a raw hide hammer or plastic mallet. You can also place the completed wire wrapped rings into a tumbler with stainless steel shot to burnish and harden the wire so the wire wrapped rings hold their shape.

Happy Beading!

Thursday, December 22, 2011

Make A Dreidel Bracelet

Before: Dreidel
It's Chanukah and there are many dreidels floating around the house. Gather a few extras and create a fun bracelet to celebrate the holiday.

Happy Chanukah!

Materials
Dreidels
16-gauge copper wire

Tools
Size 52 drill bit
Flex shaft, Dremel or drill press
14-gauge cup burr or wire rounder
Needle files

Order the dreidels
Step 1
Select the dreidels and arrange them in the order you like. We used seven dreidels but the number you need will depend on the size of the dreidels. The size links you make and the length you need for your bracelet.

Wash the dreidels with soap and water. Some of our dreidels had smudges of chocolate on them since some of the game players ate their loot.

Mark the dreiel
Step 2
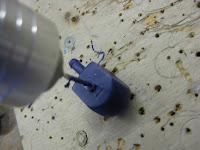
Drill the dreidel
Mark the dreidel with a center punch and then drill a hole in the dreidel to create a bead.

Step 3
Feed the wire through the dreidel. Use pliers to create a medium sized loop on either side of the dreidel.

Step 4
Assemble the bracelet. Attach the dreidels link by link until the bracelet is the desired length.

Step 5
Make the hook and eye clasp. Make a few chains of links to create several eyes so the bracelet is  adjustable.

After: Dreidel Bracelet by GeltDesigns.com
Step 6
Attach the hook and eyes of the clasp to the bracelet.

Related Tutorials
Make Chanukah Menorah Earrings from Plastic Bottle Caps
Make a Dreidel Pendant
Make Dreidel Earrings 

Further Reading
"500 Judaica: Innovative Contemporary Ritual Art (500 Series)"; Ray Hemachandra, Daniel Belasco.
"500 Bracelets: An Inspiring Collection of Extraordinary Designs (500 Series)"; Lark; 2005.

Jewelry from Found Objects.  $ spent to date: 0
Found materials: dreidels, sivivon
New Jewelry a Day.

Wednesday, July 20, 2011

Make a Ring from a Spoon

Go to almost any yard sale and you will find pieces of mismatched flatware. Rings upcycled from vintage or antique sterling silver or silver-plated spoons and other flatware are easy to construct. Spoon rings are clever, ageless jewelry.

Jewelry saw
Step 1
Select an old spoon to use to create a ring. Vintage and antique sterling silver or sterling plate flatware work particularly well and will make interesting jewelry.

Step 2
Determine the size ring you need by measuring your finger or the finger of the person for whom you plan to make the ring. If you do not have a ring sizing tool, take a piece of paper and wrap it around the finger for which you plan to make the ring. Mark and cut the paper to the ring size needed.

Step 3
Place the sizing paper on the decorative end of the spoon. Cut the spoon to size using a jewelry saw.

Sanding sponges
Step 4
File the end of the cut metal until quite smooth, then use sand paper or sanding sponges until the metal is smooth enough to be worn as a ring. You can use traditional files and sand paper or a flex shaft and sanding tools to smooth and then sand the metal.

Butane torch
Step 5
Anneal the metal cut from the spoon with a torch, to soften the metal and make forming the ring easier. If you do not have a torch, you can still form the ring but the metal will be more difficult to move and shape.

Form spoon into ring
Step 6
Form the ring by wrapping the cut metal around a ring mandrel at the size needed. Use a forming mallet to shape.

Step 7
Finish the ring by buffing and polishing to a high shine. You can leave the spoon ring shiny or you can chose from a variety of alternate finishes. For example, you can add a mat or scratch finish. You can also add color through patina or enamel.


Tuesday, July 19, 2011

Make a Bracelet from a Knitting Needle

Vintage plastic knitting needles get a new modern look when they are made into a bangle bracelet. With a few simple tools you can upcycle old knitting needles into fantastic jewelry.

Materials
Vintage plastic knitting needle(s)
Pot of boiling water
Bracelet mandrel

Step 1
Select a plastic knitting needle that you want to turn into a new bracelet.

Step 2
Boil a pot of water.

Step 3
Place the knitting needle into the water until it softens and can be formed, about 5 to 10 minutes.

Step 4
Measure your wrist and gather a mandrel in the appropriate size. Women have different wrist sizes, so it is important to measure for size before forming. Chose your mandrel based on the size you need. An average bangle size is about 8" inner circumference (20 cm inner circumference). If you do not have a bracelet mandrel, look around your house for a substitute. Baseball bats, certain canned goods, jars, a fallen tree limb and similar round objects can all be used a mandrels in a pinch.

Step 5
Carefully remove the knitting needle from the water using tongs or tweezers and wrap the knitting needle around a mandrel to the size you desire for your bracelet.

Step 6
Allow the plastic to cool on the mandrel or, to hasten the process, remove the bracelet from the mandrel and place it in a bowl of cold water to set.

Step 7
Adjust the bracelet. If you are not happy with the shape you can put the knitting needle back into the boiling and repeat the process until you are pleased with the result.

Warnings
Note that the colors may change or fade when boiled. You can use the same technique to make a knitting needle ring. Substitute a ring mandrel for the bracelet mandrel.

If you do not like working on your stove top, you can preheat an oven (or toaster oven) designated solely for crafts to 350 degrees F and then bake the knitting needles for about 5 to 8 minutes, or until the plastic is pliable.

Take care when working with boiled water.

Be sure to use proper exhaust and ventilation when heating and forming plastic.

Do not reuse pots for food after using for crafts.

Take care that knitting needles used are not sharp. File away any burrs, sharps or items that could catch clothes or injure the wearer.

Monday, July 18, 2011

Make a Cell Phone Charm

Cell phone charm by GeltDesigns.com
Most cell phones look the same until you decorate them with a cell phone charm! We used basic wire wrapping techniques to create a cell phone charm using basic tools available in most beading, jewelry supply and hardware stores.

Materials
Bead(s)
Cell phone finding
Head pin

Tools
Chain nose pliers
Round nose pliers
Wire cutters

Step 1
Assemble your tools and materials.

Select your beads and arrange your design. You can use any loose beads that fit on the head pin, including craft beads, lampwork beads, blown glass beads, dichroic beads, sterling silver beads, gold filled beads. You can also combine different types of beads as you sort through jewelry supplies to find your ideal pattern.

Step 2
Feed the beads onto the head pin in your desired pattern.

Make loop
Step 3
Use round nose pliers to create a loop at the top of the head pin just above the last bead. Wrap the tail end of the wire three times to secure the loop. Trim any excess wire with your wire cutters. File smooth, if needed.

Step 4
Open finding
Open the finding with your pliers.

Step 5
Attach the charm to the finding. Slip the loop of the drop you just created onto the cell phone finding. Close the loop of the cell phone finding with your pliers so
Attach charm & close finding
that it is secure.

Step 6
Your cell phone charm is now ready to be placed on the cell phone. Make a few and use them interchangeable.

Saturday, April 2, 2011

NJAD Index by Type of Found Object (Nov. 2010 - March 2011 / Months 1 - 5 )

Yesterday, we published an index of our New Jewelry a Day projects for the first five months by type of jewelry. Today, we present an index of the projects from November 2010 through the end of March 2011 by the type of found object used to create each NJAD project:

Bottle Caps
Make a Hatpin from a Bottle Cap
Make Earrings from Beer Bottle Caps
Make a Bracelet from Beer Bottle Caps
Make Cuff Links from Beer Bottle Caps
Make Earrings from Plastic Bottle Caps
Make a Necklace from Plastic Bottle Caps
Make Chanukah Menorah Earrings from Plastic Bottle Caps

Bottles & Jars
Make a Green Necklace for St. Patrick's Day
Make a Beer Bottle into a Heart Pin
Make a Bracelet from a Plastic Bottle
Make a Cuff Bracelet from a Plastic Bottle
Make a Pendant from a Bottle
Turn a Glass Jar into a Pendant

Box
Make a Bracelet from a Handle 

Buttons
How to Make a Pin from a Button
Make a Hair Clip from a Button
Make a Ring from a Button
Make a Leather & Button Bracelet
Make a Button Bracelet
Make Button Earrings
Make a Chain and Button Bib Necklace

Chain
Make a Belt from Brass Chain
Make a Chain and Button Bib Necklace

Duct Tape
Make a Braided Duct Tape Bracelet
Make Duct Tape Earrings
 
Game Pieces
Make a Valentine's Day Heart Pendant from a Scrabble® Tile
Make a Bracelet from Scrabble® Tiles
Make Game Piece Earrings
Make Post Earrings from Vintage Game Pieces

Gift Card
Make Post Earrings from a Gift Card
Make a Necklace from a Credit Card
Make a Bracelet from a Gift Card
Make Earrings from an iTunes Gift Card

Glass
Make a Zipper Pull from Scrap Glass
Make a Beer Bottle into a Heart Pin
Make a Pin from a Glass Pebble
Make Glass & Copper Earrings
Make Leather & Lampwork Glass Bead Earrings
Make a Pendant from a Bottle
Turn a Glass Jar into a Pendant
Make a Glass & Knotted Leather Necklace
Make a Glass & Brass Link Bracelet
Make Recycled Glass & Sterling Silver Earrings
Make a Kiln Formed Bracelet
Make a Glass Charm Necklace

Hair Bands
Make a Stone & Elastic Belt 

Hardware
Make Earrings from Copper Washers Using Cold Connections
Make Hammered Copper Earrings from Washers
Make a Hammered Pendant from Washers
Make a Necklace from Lock Washers & Toys
Make Heart Earrings from Copper Staples
Make a Heart Pendant from a Copper Washer
Make Earrings with Lock Washers
Cold Enamel a Washer to Make a Pendant
Make a Stamped Pendant from a Washer
Make Hex Nut Earrings
Make a Three Strand Bracelet from Copper Washers
Make a Bib Necklace from Washers
Make Earrings from Grommets
Make a Bracelet from Grommets

Holidays
Make a Pate De Verre Clover Pin
Make a Green Necklace for St. Patrick's Day
Make a Valentine's Day Cuff Bracelet
Make a Valentine's Day Necklace from Shoe Lace Charms
Make Heart Earrings from Copper Staples
Make a Beer Bottle into a Heart Pin
Make "Kiss Me" Heart Earrings
Make a Valentine's Day Pendant from a Scrabble® Tile
Make a "True Love" Bracelet from Scrabble® Tiles
Make a Valentine's Day Pendant from a Copper Washer

Make a Stamped Bracelet

Make a Pin from a Glass Pebble

Make LEGO® Christmas Earrings

Make Chanukah Menorah Earrings from Plastic Bottle Caps

Make a Dreidel Pendant

Make Dreidel Earrings


Leather

Make a Leather & Brass Link Bracelet

Make Leather & Lampwork Glass Bead Earrings

Make a Leather & Button Bracelet


LEGO®

Make a Super Bowl Necklace from LEGO®

Make Wine Cup Earrings

Make a LEGO® and Chain Necklace

Use LEGO® as Beads to Make a Necklace

Make LEGO® Christmas Earrings

Make a Giant LEGO® Necklace

Make Lego Earrings


Misc

Make a Memory Wire Necklace from Rubber and Sterling Silver
Make a Pate De Verre Clover Pin
Make Earrings from Ballpoint Pen Caps
Make a Bracelet from a Plastic Box Handle 
Make a Ring from a Silver Liberty Mercury Dime
Make a Necklace from Shoe Lace Charms
Make Heart Earrings from Copper Staples
Make "Kiss Me" Heart Earrings
Make a Ring from Gimp
Turn an Earring into a Pendant
Make Earrings from Shoe Charms


Paper
Make a Paper Bead Pendant
Make a Valentine's Day Cold Enamel Cuff Bracelet 
Make Paper and Rubber Earrings
Make Earrings from Paper
Make a Necklace from Paper

Pipe
Make a Pendant from Enameled Piping
Turn a Pipe into Enamels Beads
Make Earrings from Copper Pipe and Wire
Make an Enamel Necklace from a Copper Pipe
Make a Beaded Bracelet with Copper Pipe & Wire
Make a Neck-Ring from Copper Pipe
Make a Bangle Bracelet from a Copper Pipe

Polymer Clay
Make a Crab Pendant from Polymer Clay

Rubber
Make Paper and Rubber Earrings

Scrap Book Supplies
Make "Kiss Me" Heart Earrings

Scrap Metal
Make Wire Wrapped Rings
Make a Valentine's Day Cuff Bracelet from Scrap
Make Wishbone Earrings from Wire
Make Earrings from Scrap Paper & Copper
Make Glass & Copper Earrings
Make Earrings from Scrap Wire
Make a Stamped Bracelet
Make Earrings from Copper Wire
Make a Tricolored Riveted Pendant & Chain
Make Tricolored Riveted Earrings


Shells
Drill Shells to Create a Beaded Shell Chain
Make a Necklace from Shells

Steel
Make Earrings with Lock Washers
Make a Bangle Bracelet from Steel Wire
Make a Bracelet from Steel Wire
Make Earrings from Steel Wire

Toys
Make a Crab Pendant from a Toy
Make a Necklace from Lock Washers & Toys
Make Wine Cup Earrings
Make a Charm Bracelet from Toy Figurines
Make a Cartoon Pendant
Make a Spider Pin from a Toy
Make a Necklace from Figurines
Make a Lizard Pin from a Toy
Make Dog Earrings from Toys
Make Post Earrings from Vintage Game Pieces
Make a Dreidel Pendant
Make Dreidel Earrings

___________________________

Month 6. Jewelry from Found Objects.  $ spent to date: 0
New Jewelry a Day.

Friday, April 1, 2011

NJAD Index by Type of Jewelry (Nov. 2010 - March 2011/ Months 1 - 5)

Today begins month six (6) of our New Jewelry a Day project. March was a rough month. We missed days due to sickness and internet down time... but to date, the girls of GeltDesigns.com resisted the temptation to supplement our ample craft supplies and instead used only what we have and what we can find in our recycling can to make the jewelry projects of our year long adventure. We sifted through the toy box, our craft corner and rescued lots of materials from the recycling bin ...but so far we girls met our self imposed goal of spending no money on our NJAD project.

 It helps us to begin the month by taking inventory of completed projects. Here is an updated index of the NJAD projects from November 2010 through March 31,  2011 by type of jewelry or accessory made:

Beads
Turn a Pipe into Enamels Beads

Belts
Make a Belt from Brass Chain
Make a Stone & Elastic Belt (Made from Hair Bands)

Bracelets
Make a Bracelet from Beer Bottle Caps
Make a Bracelet from a Plastic Box Handle
Make a Valentine's Day Cuff Bracelet
Make a Bracelet from Scrabble® Tiles
Make a Bracelet from a Handle
Make a Charm Bracelet from Toy Figurines
Make a Bracelet from a Plastic Bottle
Make a Cuff Bracelet from a Plastic Bottle
Make a Stamped Bracelet
Make a Braided Duct Tape Bracelet
Make a Leather & Brass Link Bracelet
Make a Three Strand Bracelet from Copper Washers
Make a Leather & Button Bracelet
Make a Beaded Bracelet with Copper Pipe & Wire
Make a Bracelet from Grommets
Make a Glass & Brass Link Bracelet
Make a Bracelet from a Gift Card
Make a Button Bracelet
Make a Bangle Bracelet from Steel Wire
Make a Bracelet from Steel Wire
Make a Bangle Bracelet from a Copper Pipe
Make a Kiln Formed Bracelet 

Cuff Links
Make Cuff Links from Beer Bottle Caps

Earrings
Make Earrings from Beer Bottle Caps
Make Earrings from Ballpoint Pen Caps
Make Earrings from Plastic Bottle Caps
Make Earrings from Copper Washers Using Cold Connections
Make Hammered Copper Earrings from Washers
Make Earrings from Copper Pipe and Wire
Make Heart Earrings from Copper Staples
Make "Kiss Me" Heart Earrings
Make Earrings with Lock Washers
Make Wine Cup Earrings
Make Hex Nut Earrings
Make Wishbone Earrings from Wire
Make Game Piece Earrings
Make Paper and Rubber Earrings
Make Earrings from Scrap Wire
Make Dog Earrings from Toys
Make Glass & Copper Earrings
Make Post Earrings from a Gift Card
Make Leather & Lampwork Glass Bead Earrings
Make LEGO® Christmas Earrings
Make Duct Tape Earrings
Make Earrings from Grommets
Make Post Earrings from Vintage Game Pieces
Make Earrings from an iTunes Gift Card
Make Earrings from Shoe Charms
Make Earrings from Copper Wire
Make Chanukah Menorah Earrings from Plastic Bottle Caps
Make Dreidel Earrings 
Make Earrings from Steel Wire
Make Tricolored Riveted Earrings
Make Recycled Glass & Sterling Silver Earrings
Make Lego Earrings
Make Button Earrings

Hatpin
Make a Hatpin from a Bottle Cap

Necklaces
Make a Memory Wire Necklace from Rubber and Sterling Silver
Make a Green Necklace for St. Patrick's Day
Drill Shells to Create a Beaded Shell Chain
Make a Necklace from Plastic Bottle Caps
Make a Necklace from Lock Washers & Toys
Make a Necklace from Shoe Lace Charms
Make a Super Bowl Necklace from LEGO®
Make a Necklace from Paper
Make a LEGO® and Chain Necklace
Use LEGO® as Beads to Make a Necklace
Make a Necklace from a Credit Card
Make a Giant LEGO® Necklace
Make a Bib Necklace from Washers
Make a Necklace from Shells
Make a Glass Charm Necklace
Make a Chain and Button Bib Necklace

Neck-Rings
Make an Enamel Necklace from a Copper Pipe 
Make a Neck-Ring from Copper Pipe

Pendants
Make a Pendant from Enameled Piping
Make a Crab Pendant from a Toy
Make a Hammered Pendant from Washers
Make a Paper Bead Pendant
Make a Pendant from a Scrabble® Tile
Make a Valentine's Day Heart Pendant from a Copper Washer
Make a Crab Pendant from Polymer Clay
Cold Enamel a Washer to Make a Pendant
Make a Stamped Pendant from a Washer
Make a Cartoon Pendant
Make a Pendant from a Bottle
Turn a Glass Jar into a Pendant
Turn an Earring into a Pendant
Make a Dreidel Pendant
Make a Tri-colored Riveted Pendant & Chain

Pins
Make a Pate De Verre Clover Pin
How to Make a Pin from a Button
Make a Beer Bottle into a Heart Pin
Make a Spider Pin from a Toy
Make a Lizard Pin from a Toy
Make a Pin from a Glass Pebble

Rings
Make a Ring from a Button
Make a Ring from a Silver Liberty Mercury Dime
Make Wire Wrapped Rings
Make a Ring from Gimp

Zipper Pull
Make a Zipper Pull from Scrap Glass

___________________________

Month 6. Jewelry from Found Objects.  $ spent to date: 0
New Jewelry a Day.